Table of Contents
- Introduction
-
How to Submit Documents via EDDS (Sender)
- Step 1: Welcome
- Step 2: Getting Started
- Step 3: Enter Your Information
- Step 4: Select a Court
- Step 5: Select Case Type
- Step 6-A: Attach PDF Documents for Uploading (non e-filing counties)
- Step 6-B: Attach PDF Documents for Uploading (e-filing counties)
- Step 7: Enter Payment Information
- Step 8: Review Your Information
- Step 9: Thank You
- Step 10: Automated Receipt Confirmation Email
- Step 11-A: Email Confirming Acceptance and/or Filing of Documents
- Step 11-B: Email Returning Documents for Correction
-
How to Review Documents Submitted via EDDS (Clerk)
- Step 1: NYSCEF Home Page
- Step 2: Login
- Step 3: Welcome
- Step 4: To-Do-List (select user group)
- Step 5: To-Do List (submissions list)
- Step 6: To-Do Item – Process Document (review documents)
- Steps for Processing Documents
- Step 7-A: To-Do Item – Process Document (comments)
- Step 7-B: To-Do Item – Process Document (process all documents)
- Step 7-C: To-Do Item Complete
- Steps for Returning Documents
- Step 8-A: To-Do Item – Process Document (return all documents)
- Step 8-B: Return Document
- Step 8-C: Return Document Confirmation
- After Document Is Reviewed and Processed
- Retrieving a Processed Document
Introduction
The Electronic Document Delivery System (EDDS) was developed to ensure access to New York's courts for approved proceedings during the COVID-19 pandemic. EDDS provides secure and efficient electronic delivery of documents, eliminating the need for physical contact at the courthouse. EDDS serves as a "virtual post office" for attorneys, litigants, court-appointed fiduciaries, and other interested parties to submit documents to the court.
Back to Table of ContentsBenefits of Electronic Document Delivery System (EDDS)
- Provides a secure method to electronically transmit documents
- Enforces strict controls over document visibility
- Includes comprehensive built-in virus checking
- Tracks the sending/receiving of documents for audit purposes
- Retains all documents in statewide content management system
Preparing Your Documents for Uploading to EDDS
Your PDF document must comply with the following criteria:
- PDF/A
- Text Searchable (OCR)
- 1-inch margins
- Resolution of 200 dots per inch
- Flattened (if multi-layered)
- NOT password-protected or encrypted
- NOT contain any objects
- NOT have long file name
EDDS requires that all submitted documents conform to PDF/A specifications. EDDS will not accept documents that contain open action tags or JavaScript. Documents may not be accepted if the above specifications are not met.
Back to Table of ContentsService
Unlike e-filing, document submission via EDDS does not constitute service of the document upon any other party. If service is required, you must serve by some other electronic means, including email or facsimile, and upload a Proof of Service document (i.e., Affidavit, Affirmation or Acknowledgement) with your submission.
Back to Table of ContentsFiling
Unlike e-filing, document submission via EDDS does not constitute filing, but you can request that your document is accepted for filing by checking the Filing box on the Enter Your Information screen [read How to Submit Documents via EDDS - Step 3: Enter Your Information]. After reviewing the document, the Court or County Clerk, as applicable, determines if the document meets established filing requirements and is suitable for filing, and you will get an email notifying you of whether your document is accepted for filing or not [read How to Submit Documents via EDDS - Step 11-A: Email Confirming Acceptance and/or Filing of Documents and Step 11-B: Email Returning Documents for Correction].
Back to Table of ContentsAuthorized Document and Proceeding Types for EDDS Submission
EDDS provides a mechanism for parties to electronically submit civil case documents to the Supreme Court only in counties that do not have an existing e-filing program. Parties are required to electronically submit civil case documents to the Supreme Court via NYSCEF when an e-filing program already exists in that county [see Chief Administrative Judge Mark's Administrative Orders 81, 81A and 81B dated March 26, 2020].
-
The following counties do not currently have e-filing programs for Supreme Court civil cases and are authorized for EDDS document
submission in approved proceedings:
- Allegany
- Fulton
- Greene
- Hamilton
- Herkimer
- Montgomery
- Orleans
- Schenectady
- Schoharie
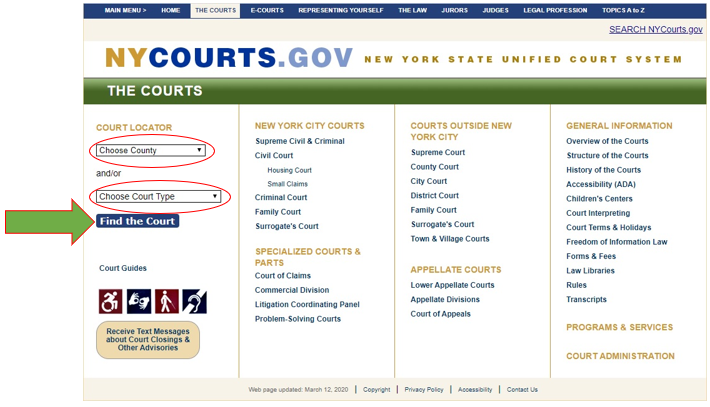
Civil document types authorized for EDDS submission may vary from week to week and from one court or judicial district to the next. If you are unsure whether your documents are authorized for submission via EDDS, contact the applicable Court or Judicial District Office to confirm before submitting. To find court contact information, use the Court Locator on the Unified Court System's public webpage, choose the county and court type from the drop-down menus, and then click the Find the Court button.
-
The following counties have existing e-filing programs for Supreme Court civil cases and are not authorized for EDDS document
submission in any proceeding types:
- Albany
- Bronx
- Broome
- Cattaraugus
- Cayuga
- Chautauqua
- Chemung
- Chenango
- Clinton
- Columbia
- Cortland
- Delaware
- Dutchess
- Erie
- Essex
- Franklin
- Genesee
- Jefferson
- Kings
- Lewis
- Livingston
- Madison
- Monroe
- Nassau
- New York
- Niagara
- Oneida
- Onondaga
- Ontario
- Orange
- Oswego
- Otsego
- Putnam
- Queens
- Rensselaer
- Richmond
- Rockland
- Saratoga
- Schuyler
- Seneca
- St. Lawrence
- Steuben
- Suffolk
- Sullivan
- Tioga
- Tompkins
- Ulster
- Warren
- Washington
- Wayne
- Westchester
- Wyoming
- Yates
However, if all parties have not yet consented to e-filing, a Stipulation and Consent to E-Filing Form (PDF) may be electronically submitted via EDDS in these counties to convert a case from paper filing to e-filing [see How to Submit Documents via EDDS, Step 6-B: Attach PDF Documents for Uploading (e-filing counties)]. Parties will receive an email notification once the case is converted and is available in NYSCEF for e-filing. For questions or assistance with e-filing, please contact the NYSCEF Resource Center.
How to Submit Documents via EDDS (Sender)
Each Supreme Court will identify their targeted EDDS document submitters for civil cases (i.e., attorneys, litigants, court-appointed fiduciaries, etc.) and provide them with the following instructions on how to electronically submit documents.
Back to Table of ContentsStep 1: Welcome
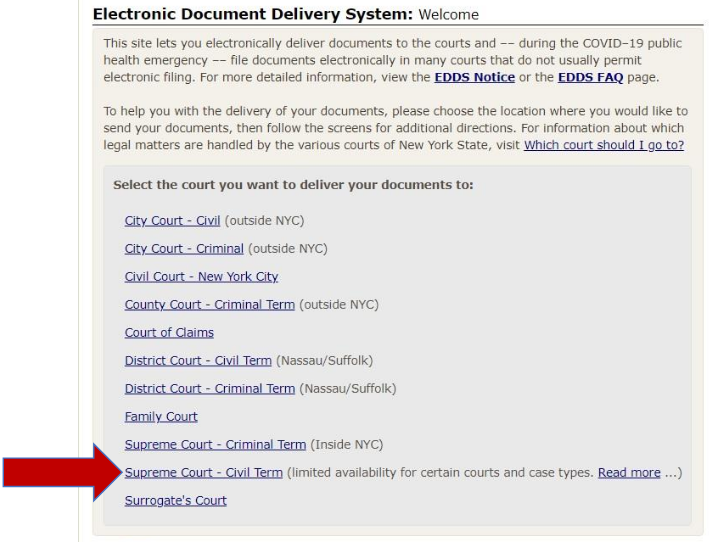
Visit the Electronic Document Delivery System submission webpage and click on the Supreme Court - Civil Term link to enter the site.
Back to Table of Contents
Step 2: Getting Started
After reading the instructions, click the Next button to begin your submission.

Back to Table of Contents
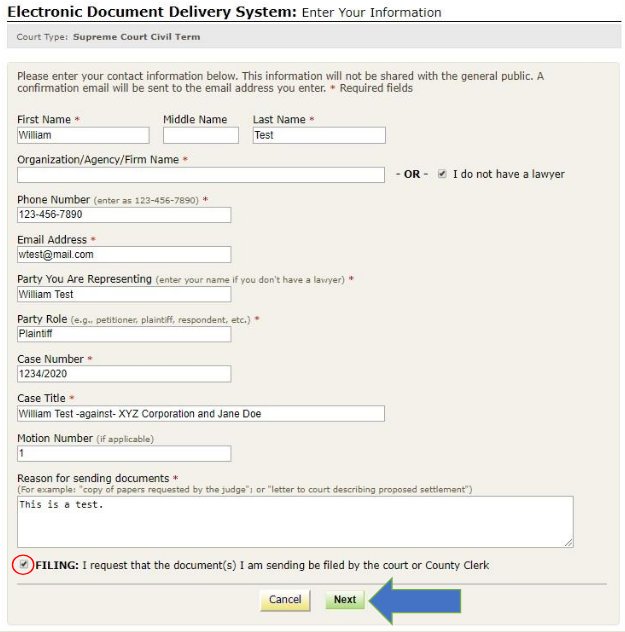
Step 3: Enter Your Information
Enter your name and contact information, case information, and briefly explain why you are submitting the document(s). You must complete all fields marked with an asterisk (*). You can enter "Unknown" or "Not Applicable" in the Case Number and Case Title fields if this is a new proceeding. Check the Filing box if you want the document(s) filed by the County Clerk. Then, click the Next button to continue.
Back to Table of Contents
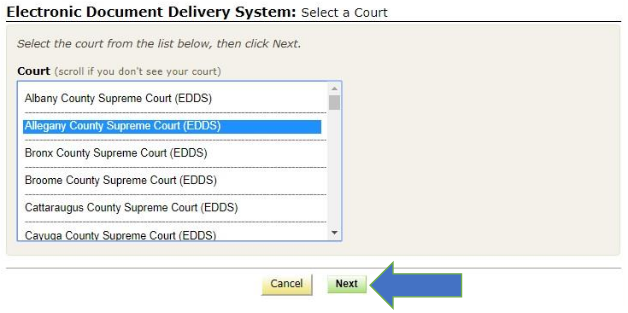
Step 4: Select a Court
Scroll through the list to select the county where you want to submit your document(s). Click the Next button to continue. NOTE: The county you select will determine what case types are available on the next screen.
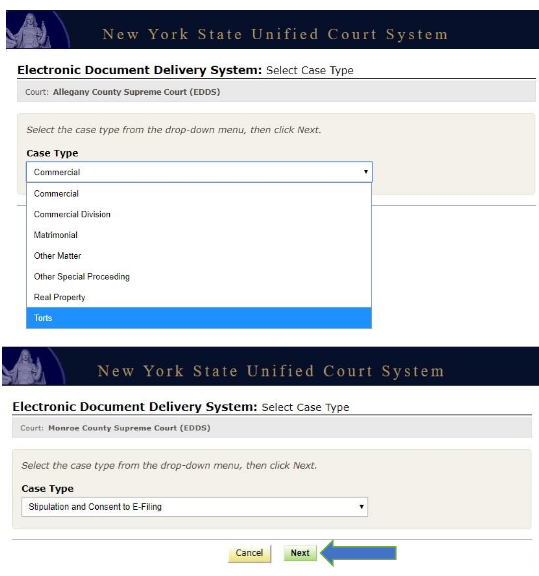
Step 5: Select Case Type
Select the case type from the drop-down list. Click the Next button to continue. NOTE: The county you selected in Step 4 determines what case types are available. If you selected a county that does not currently have an e-filing program [see section 1 of Authorized Document and Proceeding Types for EDDS Submission], all case types are available. If you selected a county that has an existing e-filing program [see section 2 of Authorized Document and Proceeding Types for EDDS Submission], only Stipulation and Consent to E-filing is available.
Back to Table of Contents
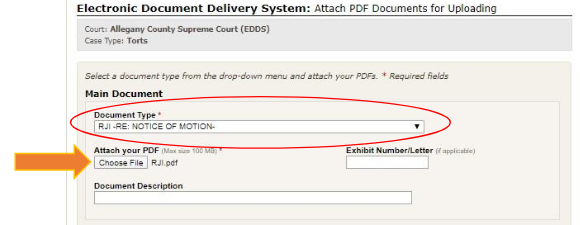
Step 6-A: Attach PDF Documents for Uploading (non-e-filing counties)
For counties that do not currently have an e-filing program [see section 1 of Authorized Document and Proceeding Types for EDDS Submission], select the Document Type you are submitting from the drop-down list and click the Choose File button to upload your PDF file. If you have more than 5 documents to submit, click the Add More Documents button. Click the Next button to continue.
Back to Table of Contents
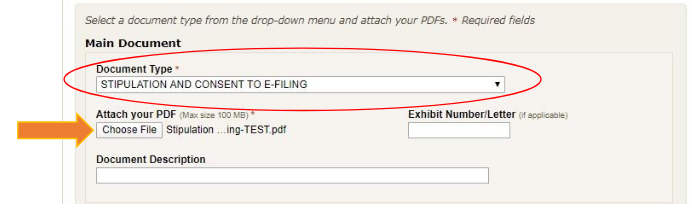
Step 6-B: Attach PDF Documents for Uploading (e-filing counties)
For counties having an existing e-filing program [see section 1 of Authorized Document and Proceeding Types for EDDS Submission], the only document type available is Stipulation and Consent to E-filing. Click the Choose File button to upload your PDF file. Click the Next button to continue.
Back to Table of Contents
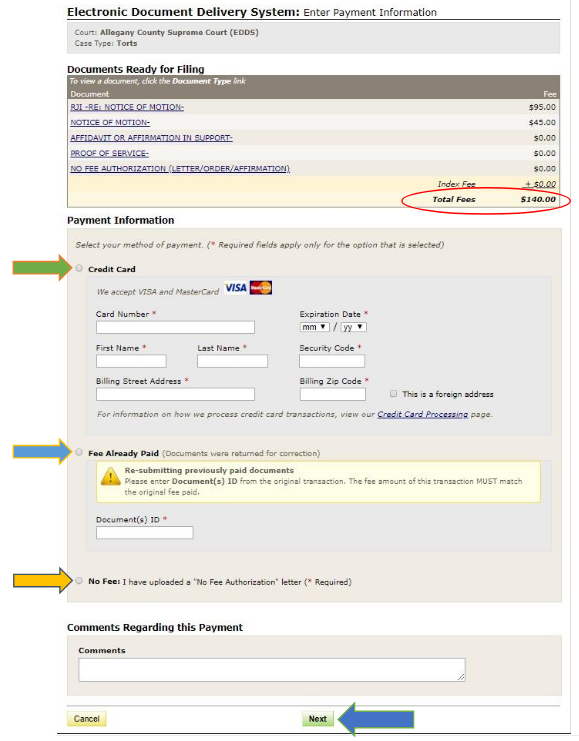
Step 7: Enter Payment Information
Fees for the documents you are submitting are listed. NOTE: If there are no fees associated with your submission, skip to Step 8.
- To pay the fees, select Credit Card and enter your credit card information.
- If the fees are already paid, select Fee Already Paid and enter the Document ID from the original transaction.
- If the fees are waived, select No Fee and make certain you have uploaded the required No Fee Authorization letter/order/affirmation. If you have not uploaded your No Fee Authorization document, click your web browser's back button and return to Step 6-A to add the document.
Click the Next button to continue.
Back to Table of Contents
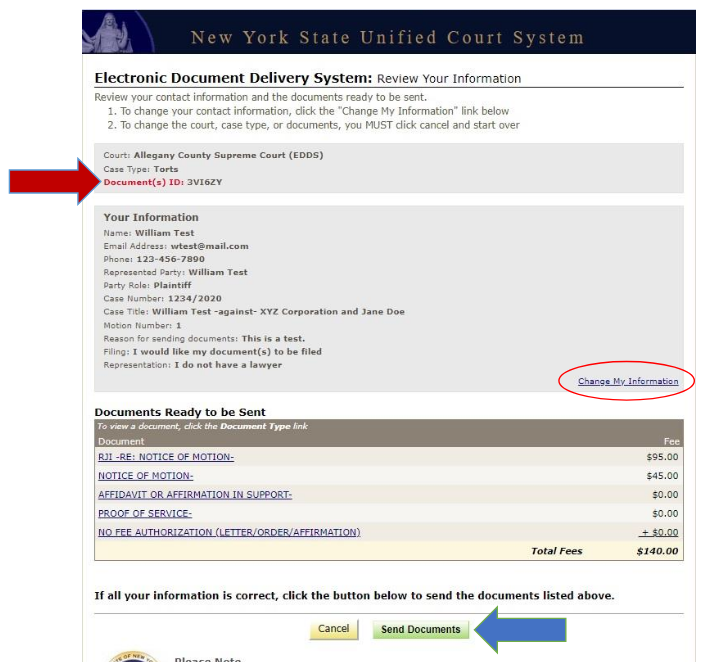
Step 8: Review Your Information
Review the information you entered. Click the Change My Information link to correct your contact information. Click the Cancel button and start over to change any other information. Click the Send Documents button to finish the submission.
Back to Table of Contents
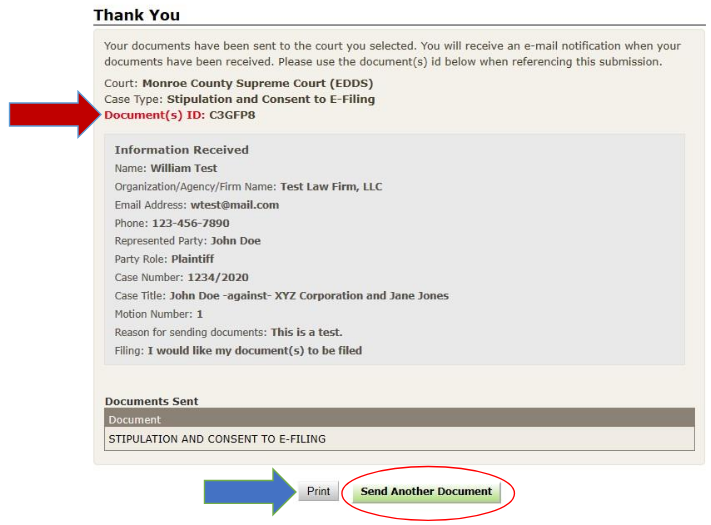
Step 9: Thank You
Click the Print button to print this screen. You can also click the Send Another Document button to begin a new
submission.
NOTE: You may need to reference your Document ID in future communications with the court. It is strongly
recommended that you print this screen by clicking the Print button and/or make a note of your Document ID before
exiting the screen.
Back to Table of Contents
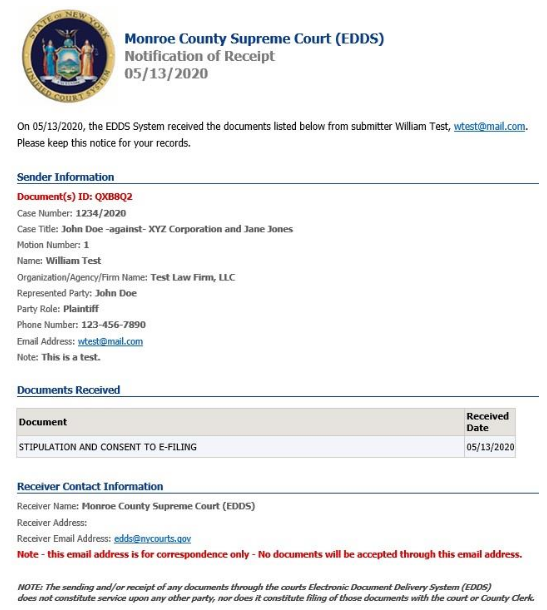
Step 10: Automated Receipt Confirmation Email
Once you have successfully submitted your documents, you will get an automated email confirming receipt by the court. After reviewing your submission, the court may either accept your documents [read Step 11-A: Email Confirming Acceptance and/or Filing of Documents] or return them for correction if a problem is identified [read Step 11-B: Email Returning Documents for Correction]. If you checked the Filing box on the Enter Your Information screen [read Step 3: Enter Your Information], the court will also determine if your submission meets established filing requirements and will process your documents for filing if appropriate.
Back to Table of Contents
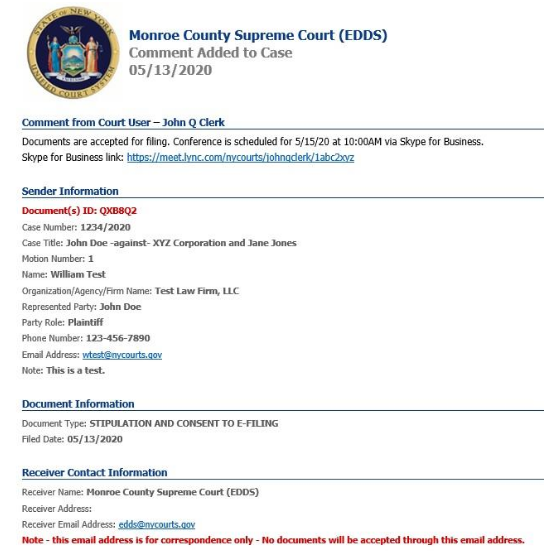
Step 11-A: Email Confirming Acceptance and/or Filing of Documents
If your documents are accepted by the court, you will receive a second email, which will include important information about your submission and directions regarding how to proceed with your case [see example below]. If you do not receive a second email from the court, you may contact the court using the email address found in the email confirming receipt of your submission [read Step 10: Automated Receipt Confirmation Email], but do not use this email address to send documents to the court. It is for correspondence purposes only.
Back to Table of Contents
Step 11-B: Email Returning Documents for Correction
If your documents are returned for correction by the court, you will receive a second email, which will include important information about your submission and directions regarding how to proceed with your case [see example below]. If you do not receive a second email from the court, you may contact the court using the email address found in the email confirming receipt of your submission [read Step 10: Automated Receipt Confirmation Email], but do not use this email address to send documents to the court. It is for correspondence purposes only.

Back to Table of Contents
How to Review Documents Submitted via EDDS (Clerk)
You can review and process documents submitted via EDDS in the court's EDDS To-Do List as listed below.
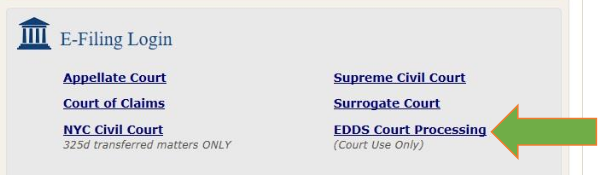
Step 1: NYSCEF Home Page
Go to the NYSCEF website and click the EDDS Court Processing link.
Back to Table of Contents
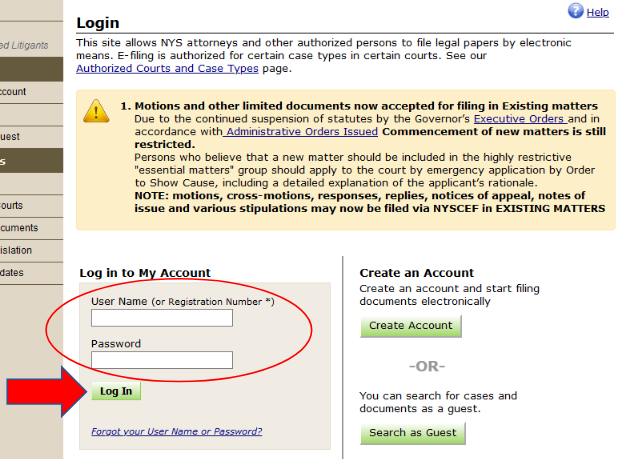
Step 2: Login
On the NYSCEF Login page, enter your User Name and Password and click the Login button.
Back to Table of Contents
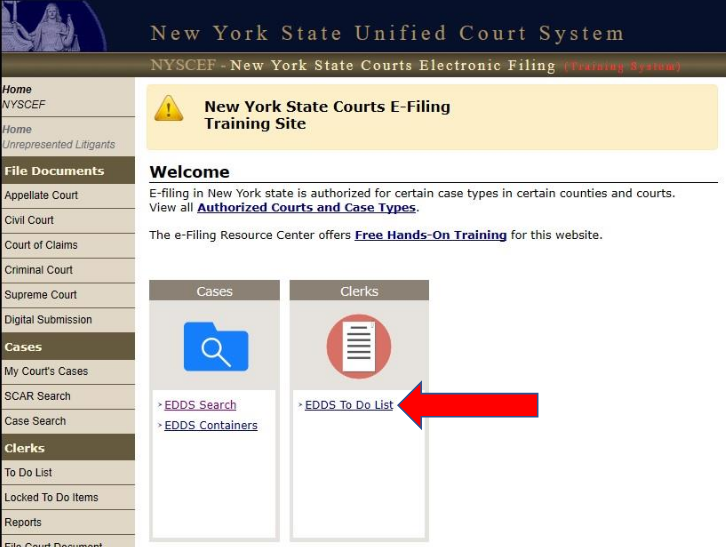
Step 3: Welcome
Click the EDDS To-Do List link in the Clerks menu
Back to Table of Contents
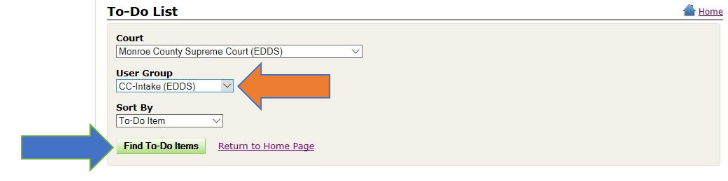
Step 4: To-Do-List (select user group)
Select the applicable user group in the User Group drop-down list. [NOTE: Most Supreme courts have only one user group called Intake (EDDS).] Click the Find To-Do Items button to display a list of submissions to the court via EDDS.
Back to Table of Contents
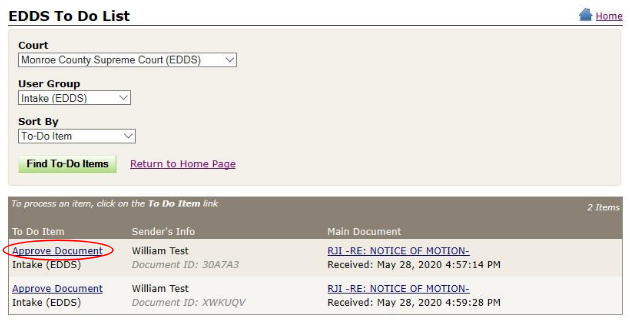
Step 5: To-Do List (submissions list)
The submissions list is displayed below the selection options. Click the Approve Document link in the To-Do Item column to begin processing the submission.
Back to Table of Contents
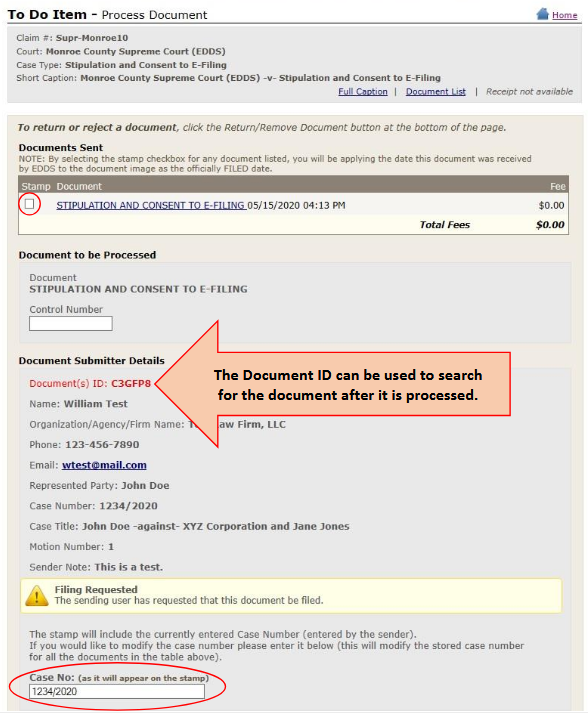
Step 6: To-Do Item – Process Document (review documents)
To view a document, click the document name link (e.g., MOTION, PETITION, STIPULATION, ORDER TO SHOW CAUSE, etc.) in the Document column, and the PDF document opens in a new browser window. After reviewing the documents, click the Process All Documents button to process all documents associated with the submission, or click the Return All Documents button to return all documents associated with the submission. Verify that the case number is correct. If not, enter the correct number in the Case Number field. Note the assigned Document ID for entry in the case management system and to search NYSCEF for the documents after they are processed. Check the Stamp box to apply a file stamp to a document if desired.
Back to Table of Contents
**AT THIS POINT IN THE PROCEDURE***
If processing the documents, go to Steps 7-A, 7-B and 7-C.
If returning the documents, go to Steps 8-A, 8-B and 8-C
Steps for Processing Documents:
Step 7-A: To-Do Item – Process Document (comments)
Add Internal Note is not applicable for EDDS submissions and should be left blank. Add Comment to Case is an optional field used only to add comments to email sent to the document submitter when the document is processed [see How to Submit Documents via EDDS - Step 11-A: Email Confirming Acceptance and/or Filing of Documents]. If a comment is entered, leave the Email Comment to Sender box checked and the Public Comment radio button selected. (The Internal Comment radio button is not used for EDDS submissions and should not be selected.) Comments for processed documents may include confirmation that the document was processed and accepted for filing and/or additional information and instructions regarding further court proceedings [see example below]. Proceed to Step 7-B: To-Do Item – Process Document (process all documents). NOTE: Comments for documents that are returned are not entered here. They are entered on the Return Document screen [see Step 8-B: Return Document]

Back to Table of Contents
Step 7-B: To-Do Item – Process Document (process all documents)
Click the Process All Listed Documents button to process all documents associated to the submission. Proceed to Step 7-C: To-Do Item Complete.

Back to Table of Contents
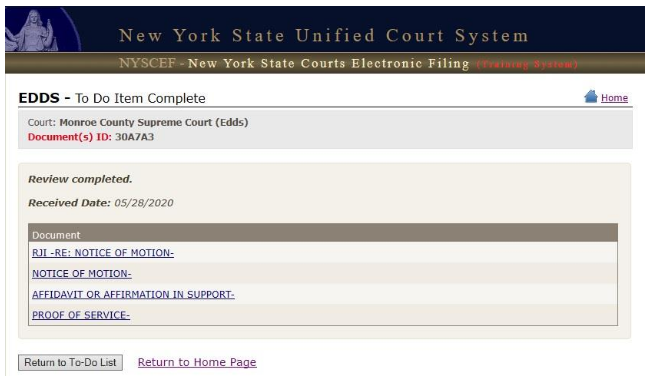
Step 7-C: To-Do Item Complete
After the document is processed, confirmation displays on the To-Do Item Complete screen. Document processing is now complete.
Back to Table of Contents
Steps for Returning Documents:
Step 8-A: To-Do Item – Process Document (return all documents)
Click the Return All Listed Documents button to return all the documents associated to the submission for correction. Proceed to Step 8-B: Return Document.

Back to Table of Contents
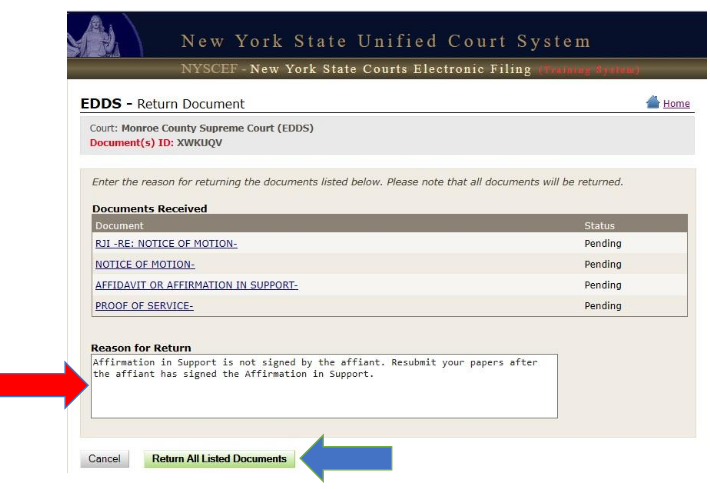
Step 8-B: Return Document
Enter a reason why the documents are being returned in the Reason for Return field, which is included in the automated email sent to the document submitter [see How to Submit Documents via EDDS - Step 11-B: Email Returning Documents for Correction]. Click the Return All Listed Documents button. Proceed to Step 8-C: Return Document Confirmation.
Back to Table of Contents
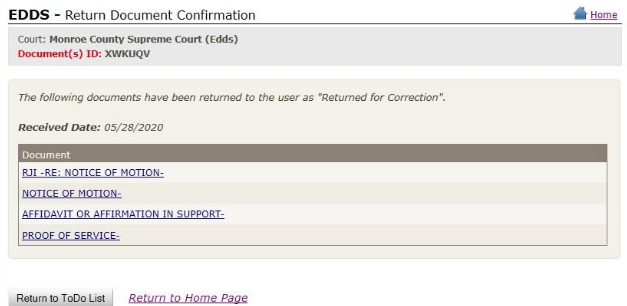
Step 8-C: Return Document Confirmation
After the document is returned, confirmation displays on the Return Document Confirmation screen. Document return is now complete.
Back to Table of Contents
After the Document Is Reviewed and Processed
It is recommended that you complete the following case management system tasks after the document review is completed and the EDDS submission is accepted:
- Enter and schedule motions
- Enter other applicable case outcomes (e.g., adjournments, stipulations of discontinuance, etc.)
- Enter the assigned EDDS Document ID in the applicable comment or remarks field
- Schedule court dates as required (e.g., conferences, hearings, etc.)
- Send notification to parties as required
-
You can preserve submitted documents and prevent unauthorized access to confidential information contained in documents downloaded
to your computer until the documents can be added to the official court file as follows:
- If using UCMS, save the PDF files to your computer. Upload the files to the corresponding case in UCMS and then delete the PDF files from your computer.
- If using CCIS or ADBM, save the PDF files to a shared folder that is password protected and ensure that only appropriate staff have access to the folder. Create different folders for different intake groups if necessary. Delete the PDF files from your computer once the documents are added to the official court file.
- Proceed as normally
Back to Table of Contents
Retrieving a Processed Document
You can retrieve processed EDDS documents using either the EDDS Search link (see Steps 1-A to 1-C) or the EDDS Containers link (see Steps 2-A to 2-D) on the NYSCEF home page as follows:
Step 1-A: NYSCEF Home Page
To search by Document ID, click the EDDS Search link in the Cases menu.

Back to Table of Contents
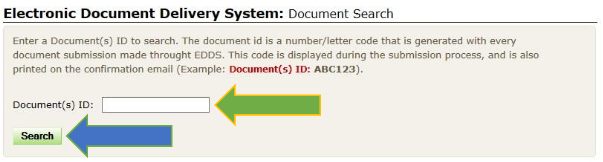
Step 1-B: Document Search
Enter the Document ID [see How to Review Documents Submitted via EDDS, Step 6: To-Do Item (review documents)]. Click the Search button.
Back to Table of Contents
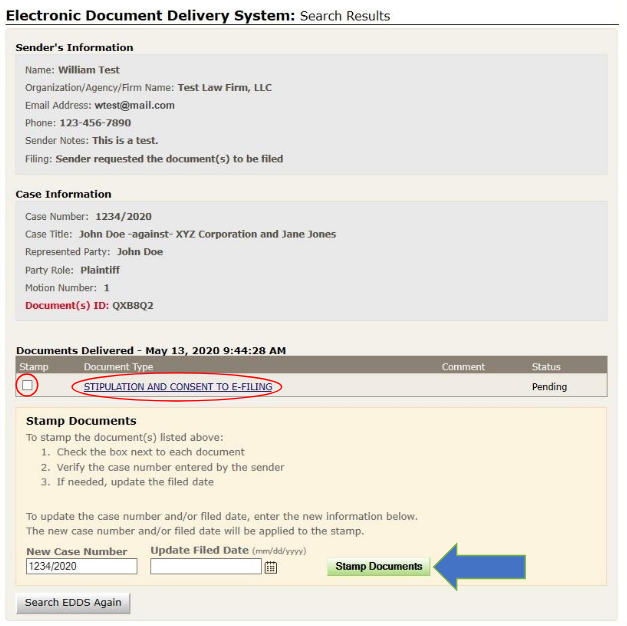
Step 1-C: Search Results
To view a document, click the document name link (e.g., NOTICE OF MOTION, AFFIRMATION/AFFIDAVIT OF SERVICE, STIPULATION, etc.) in the Document Type column, and the PDF document opens in a new browser window. If a filed stamp was not already applied on the Process Document page [see How to Review Documents Submitted via EDDS, Step 6: To-Do Item (review documents)], you may check the Stamp box and click the Stamp Documents button to apply a file stamp to a document if desired.
Back to Table of Contents
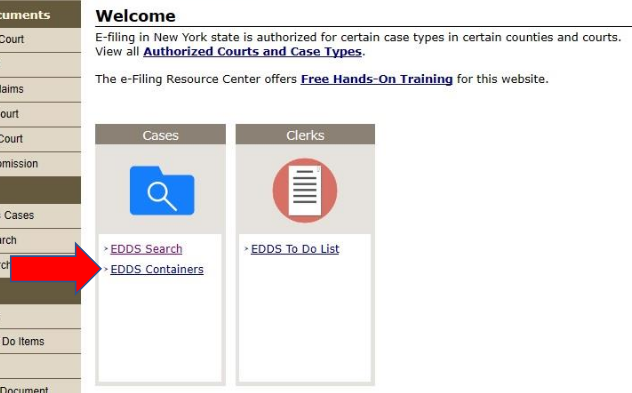
Step 2-A: NYSCEF Home Page
To search by Container, click the EDDS Containers link in the Cases menu.
Back to Table of Contents
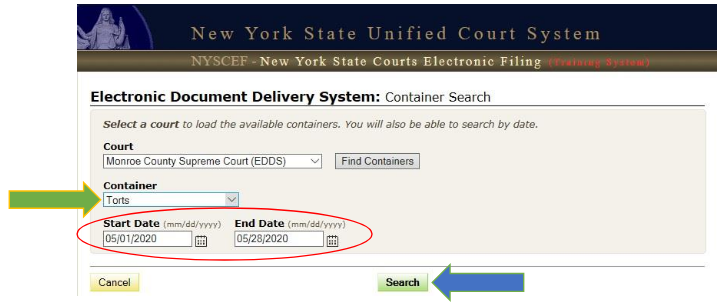
Step 2-B: Container Search (select container and date)
Select the Container from the Container drop-down list. Enter the date or date range that you wish to search. Click the Search button.
Back to Table of Contents
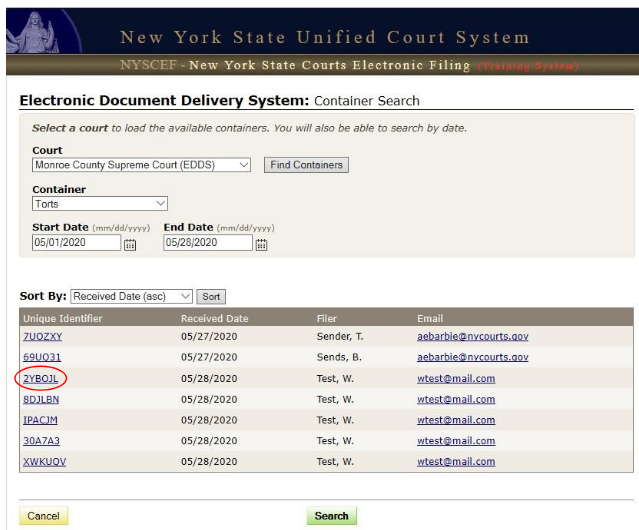
Step 2-C: Container Search (submissions list)
The submissions list is displayed below the selection options. Click the Document ID link in the Unique Identifier column to view the sender information and list of documents associated to the submission.
Back to Table of Contents
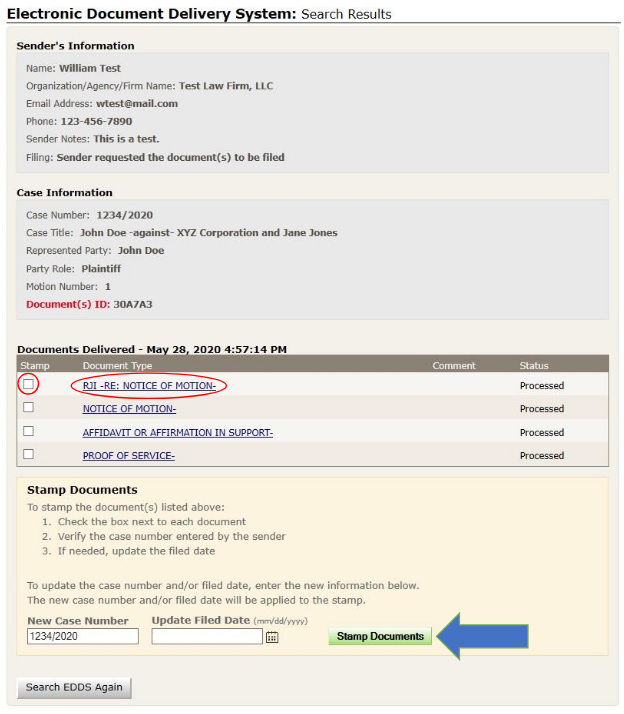
Step 2-D: Search Results
To view a document, click the document name link (e.g., NOTICE OF MOTION, AFFIRMATION/AFFIDAVIT OF SERVICE, STIPULATION, etc.) in the Document Type column, and the PDF document opens in a new browser window. If a filed stamp was not already applied on the Process Document page [see How to Review Documents Submitted via EDDS, Step 6: To-Do Item (review documents)], you may check the Stamp box and click the Stamp Documents button to apply a file stamp to the document if desired.
Back to Table of Contents